
How to Build Your First Muse Space
Open Muse, describe the idea in chat, refine it, and put it where you want it. A step-by-step guide to your first Space, from a blank chat to a working tracker, planner, or game.
 By Icarus5 min read

A Muse Space starts with a sentence. You describe what you want in chat, Muse builds it, and you refine it until it works the way you want. Here is the whole flow, as Meta demonstrates it in the launch videos.
Step 1: Open Muse and Start in Main Chat
Spaces start in Main chat, the same place you talk to Muse. Meta’s walkthrough opens there, with the user typing a request to the assistant. You do not need to open a special builder or switch modes. The chat is the builder.
Step 2: Describe the Idea in Plain Words
Tell Muse what the Space should do, and be specific about the job behind it. The launch demos show the range that works. One user asks for a space about the plants found on walks, with a photo, a name, and where each one was found. Another asks Muse to turn a request into a space to keep using, like a planner, a gift tracker, or a game. A third asks to book a tee time on Thursday for a trip.
A good description names the thing being tracked and what goes in it. “A space about the plants I find on walks: a photo, a name, and where I found each one” gives Muse enough to build a field notebook with entries, photos, dates, and locations. “A wedding planner” is a starting point, but “a wedding planner with an RSVP list, vendor invoices, and to-dos” tells Muse what sections to build. If you are not sure what to ask for, start with the routine: what do you check, what do you forget, what do you want in one place.
Step 3: Let Muse Build the First Version
Muse builds the first version from the description. In the garden demo, the reply is “Building Garden Monitor…” and the result is a field notebook titled “What’s growing out there?” with five finds, five species, and five places, and starter samples already filled in. In the family demo, the result is a dashboard with the day’s events, school pickups, and a lunchbox planner. The first version is a starting point. Expect to change it.
Step 4: Refine It by Asking
This is where a Space takes shape. Keep talking to Muse about what is missing or wrong, in the same chat. In the garden demo, the user asks to add a section for the plants not yet identified, and the interface adds an “Unknowns” filter tab. In the family demo, the user asks to add a section for movie night, and the dashboard adds one with The Wild Robot lined up for Friday night. You can also ask to change the look or how the Space works. Each request updates the Space in place.
Step 5: Put It Where You Want It
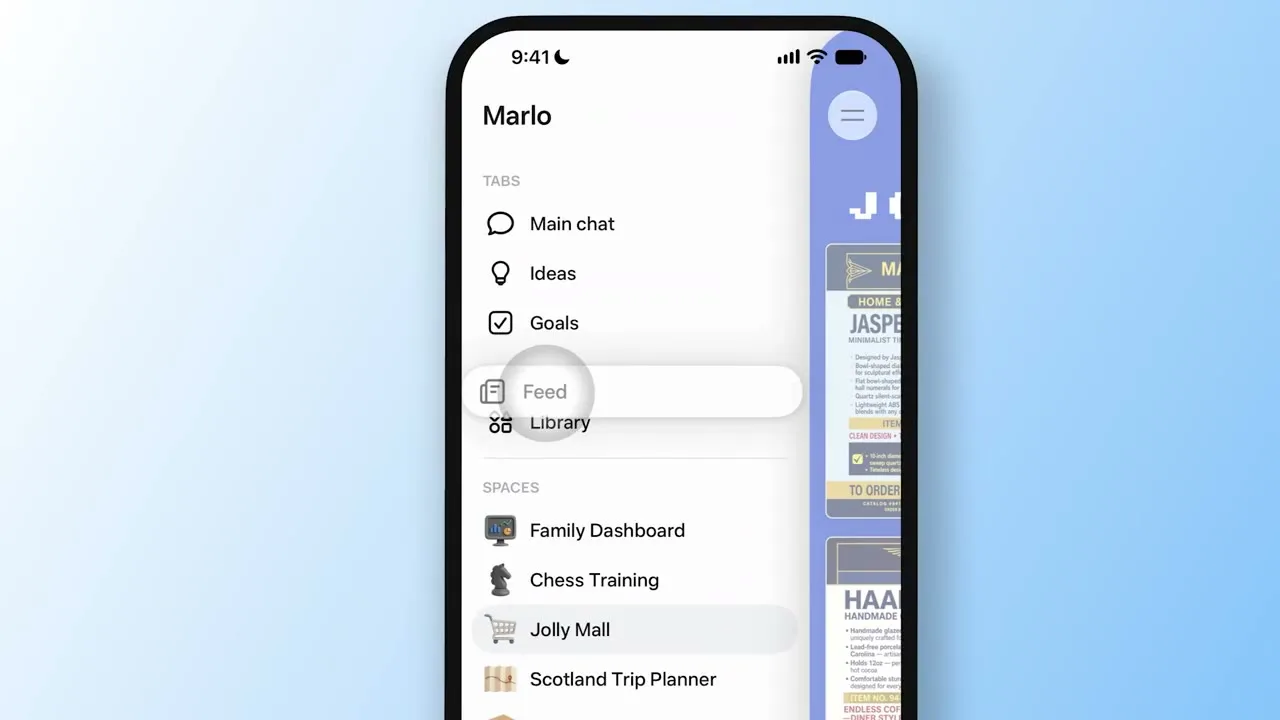
A Space can live in the sidebar or the main tabs, stay hidden until needed, or appear on a schedule. Meta’s demo shows the Space dragged into the main tabs, and the sidebar rearranged around it. You can also just ask: typing “Weekend mode please” reorganizes the sidebar so Chat, Feed, Family Dashboard, Memory Bank, and Scotland Trip Planner sit at the top, and everything else drops into the Spaces section.
Step 6: Connect Your Apps So It Updates Itself
A Space gets more useful when it is connected to the apps you already use. Meta says Spaces keep themselves up to date in the background once linked, so new concert dates, price changes, and savings progress show up without you having to ask. The examples in the launch show how that plays out: a school dashboard that finds events in school emails and adds them to the calendar, a shopping hub that pulls wishlists from Instagram saves and Marketplace listings into one view. Connect the apps the Space depends on, and the Space stays current on its own.

Three Tips for a First Space
Pick a routine. The Spaces that work best in the demos track something that repeats: school pickups, lunches, workouts, trips, orders. A Space earns its place by saving the same small effort every day.
Start narrow. One job, one Space. A garden notebook that tracks plants is easier to refine than a dashboard that tries to run a whole household. You can always ask Muse to add a section later.
Let it change. The first version is a draft. The demos all show the same pattern: build, use, ask for the missing piece, repeat. A Space that never changes is a Space that stopped being useful.
Spaces are available everywhere Muse is available. If you want the full picture first, the explainer covers what Spaces are and how they work, and the deep dive walks through Meta’s launch demos in detail.